Manage your compute workload using HTCondor
/ 11 min read
Table of Contents
This article was also published in Yonder TechBlog.
Introduction
I really like it when technology comes to the aid of science, helping in the analysis of various systems of interest. This is one of the reasons why I am fond of Computational Chemistry. I discovered this field during my student years and I have been fascinated ever since.
In chemistry, physics and biology, researchers sometimes have to resort to computer simulation in order to investigate a system. More often than not, these computer simulations are quite demanding on the available resources. Depending on the investigated system, a single simulation may take anywhere from a few hours to a few days to complete and the problem is that an experiment often consists of multiple simulations. Given this, running these simulations concurrently whenever possible is advantageous. Nowadays, many research institutes and universities have their own computer clusters and use a workload management system of their choice to distribute simulation jobs from all users to available resources.
You might wonder why researchers resort to computer simulations. One important factor, which needs to be considered, is the financial aspect. For example, in chemistry, a traditional experiment requires reagents, equipment, and human resources. A simulation, however, can be done without reagents, and there is little human involvement once the simulation has started. Additionally, if we have multiple hypotheses to test, a simulation may be a good first step, helping to exclude the most improbable hypotheses. This approach is often used in drug screening and design¹.
Some time ago, I had the opportunity to configure a computer cluster from scratch. In this article, I’d like to show you how to easily set up a workload management system for a cluster.
A few words about computer clusters
A computer cluster is a set of interconnected computers that are able to work together and as a result can be treated as an unified pool of resources.
To give an example, let’s suppose that we have 5 computers with 8 CPU cores and 8 GB of RAM each and we want to run 5 jobs. In this case, I can make use of all available compute power by manually starting one task on each machine. This seems manageable since we have only 5 jobs and 5 computers, but if we would have 1000 jobs and 1000 computers, everything will become very tiresome, very soon. Moreover, if the number of jobs and the number of computers would not be equal, we would have a decision to make — which jobs should run first ? Also, some computers might be more powerful than others and we should take this into consideration when we run a job.
I think it’s obvious that it would be easier if we would set up a computer cluster and automate the distribution process. If we do this, then our problem will be reduced to a single action: adding the jobs to a queue.
Introducing HTCondor
HTCondor is an open source and specialized workload management system for compute-intensive jobs. It is used to create a pool of machines and distribute jobs among them based on the specific requirements of each job.
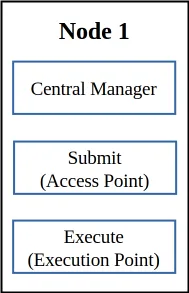
There are 3 roles a machine may have in a HTCondor pool:
-
Central Manager: This will be the brain of the pool. A pool can have only one central manager. Every machine in the pool will communicate over the network with the central manager, so it is recommended to have a good network connection between the central manager and the other machines.
-
Submit (Access Point): Machines with this role will be able to submit jobs to the queue. Any machine in the pool, including the central manager, can fulfill this role.
-
Execute (Execution Point): Machines with this role will be able to run jobs that are in the queue. Any machine in the pool, including the central manager, can fulfill this role.
I will now show to you how to install and configure HTCondor on Linux. Note that you will need to have access to the root account. If you are not currently logged in as root, you can switch to the root account using:
sudo su -To install HTCondor, you will have to download the installation script from the HTCondor website and mark the script as an executable:
curl -fsSL https://get.htcondor.org > get_htcondorchmod +x get_htcondorFor the following installation I’ve used Rocky Linux 9. The installation steps from the script might slightly differ based on your distribution.
On the Rocky Linux 9, the installation script will do the following:
-
Identifying the distribution you are using.
-
Installing procps-ng.
-
Installing epel-release.
-
Installing the HTCondor repository and importing the RPM keys.
-
Installing HTCondor.
-
Configuring role (if specified).
-
Opening port 9618 (the port used by HTCondor for network communication)
-
Starting and enabling HTCondor service.
Installing HTCondor in a single-node setup
f you have a single node setup, you will need to install minicondor. In this scenario, the node will fulfill all of the roles described above.
To install minicondor you will need to run get-htcondor script with the following arguments:
./get-htcondor --minicondor --no-dry-runAfter the installation is done, condor service should be up and running. You can check if the service is running using systemctl:
systemctl status condorIf condor is not running, you can start it using:
systemctl start condorNow you should be able to view the queue using condor_q:
condor_q
-- Schedd: sandbox01 : <127.0.0.1:9618?... @ 09/01/24 18:44:44OWNER BATCH_NAME      SUBMITTED   DONE   RUN    IDLE   HOLD  TOTAL JOB_IDS
Total for query: 0 jobs; 0 completed, 0 removed, 0 idle, 0 running, 0 held, 0 suspendedTotal for vagrant: 0 jobs; 0 completed, 0 removed, 0 idle, 0 running, 0 held, 0 suspendedTotal for all users: 0 jobs; 0 completed, 0 removed, 0 idle, 0 running, 0 held, 0 suspended
Installing HTCondor in a multiple-node setup
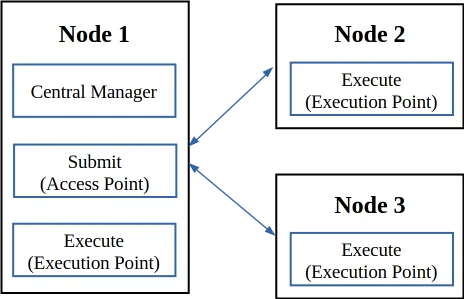
If you have multiple nodes, you will have to install condor on each node using the get_htcondor script. For this tutorial, I will configure a setup with 3 nodes in which 1 node will have the roles of Central Manager, Submit and Execute, and the other 2 nodes will have only the Execute role. In this scenario, you will be able to submit jobs from one node only, but any job will be able to be executed on any node (assuming that the node meets all job’s requirements, referring here to CPU cores available, RAM memory available, etc.).
On the Central Manager node
The steps are similar to those from the single-node setup, with a few changes. First of all, for convenience, you can add an entry to the /etc/hosts file in order to call the central manager node as manager.htcondor.lan.
echo "<IP of the central manager node> manager.htcondor.lan" >> /etc/hostsNow you can install HTCondor on this node acting as a central manager with:
./get_htcondor --central-manager manager.htcondor.lan --password <EXAMPLE> --no-dry-runAfter the installation is done, the condor process should be up and running. You can check its status with systemctl.
The central manager is configured, but if you try to view the queue with condor_q you will see the following message:
condor_q
Error: Can't find address for schedd manager.htcondor.lan
Extra Info: [...]
This is because the central manager node doesn’t fulfill by default the role of a submit node. This needs to be added manually to the configuration file of the node. Additionally, we want the central manager to be able to execute queued jobs and for convenience we will add the Execute role in this step too. Two new lines must be added to the /etc/condor/config.d/01-central-manager.conf file:
echo "use role:get_htcondor_submit" >> "/etc/condor/config.d/01-central-manager.conf"echo "use role:get_htcondor_execute" >> "/etc/condor/config.d/01-central-manager.conf"After adding these lines to the configuration file, you should reconfigure the HTCondor daemons by executing the following command:
condor_reconfigNow you should be able to see the queue using condor_q, and the central manager node should be able to execute queued jobs.
On the Execute nodes
Similarly to the central manager node, you can add an entry to the /etc/hosts file to let the execute node call the central manager node as manager.htcondor.lan :
echo "<IP of the central manager node> manager.htcondor.lan" >> /etc/hostsNow you can install HTCondor on this node acting as an execution point with:
./get_htcondor --execute manager.htcondor.lan --password <EXAMPLE> --no-dry-runAfter the installation is done, you can check if the service is running, and if it’s not you can start it with systemctl start condor.
Now you are all set. To verify if everything is working fine, just check the status of the HTCondor:
condor_status
Name OpSys Arch State Activity LoadAv Mem ActvtyTime
Total Owner Claimed Unclaimed Matched Preempting Drain Backfill BkIdle
X86_64/LINUX 2 0 0 2 0 0 0 0 0
Total 2 0 0 2 0 0 0 0 0The only thing left is to repeat the steps above for the other execute node. After everything is done, you should have the following output from the condor_status command:
condor_status
Name OpSys Arch State Activity LoadAv Mem ActvtyTime
Total Owner Claimed Unclaimed Matched Preempting Drain Backfill BkIdle
X86_64/LINUX 3 0 0 3 0 0 0 0 0
Total 3 0 0 3 0 0 0 0 0Submitting your first job
Before submitting a job, you need to allow local users to submit jobs to the queue. You can do this by adding a new configuration file named 50-security.config in the /etc/condor/config.d directory. The configuration file should contain the following line ALLOW_WRITE = $(ALLOW_WRITE) *@$(HOSTNAME) . This will allow any user that exists on the central manager node to submit jobs to the queue.
echo "ALLOW_WRITE = $(ALLOW_WRITE) *@$(HOSTNAME)" > /etc/condor/config.d/50-security.configAfter doing this step, you will have to reconfigure the HTCondor daemons:
condor_reconfigTo submit a job, you need to create a submit file. First, let’s create a simple Hello World script in Bash and mark it as an executable:
echo '#!/bin/bash' > my_script.shecho 'echo "Hello World !"' >> my_script.shchmod +x my_script.shA simple submit file for this example will look as follows:
executable = my_script.shuniverse = vanillarequest_cpus = 1request_memory = 1GBerror = my_script.erroutput = my_script.outlog = my_script.logtransfer_input_files = my_script.shqueueYou can save this submit file as my_script.inp and add the job to the queue using:
condor_submit my_script.inp
1 job(s) submitted to cluster 1.
The job is now added to the queue and HTCondor will check if an execution node is available. If one is available, the script will be sent to that node and be executed there. If no execution nodes are available, the job will stay in the queue until a node becomes free. After the job is done, my_script.err , my_script.log , and my_script.out will be sent from the execution node to the submit node, which, in this case, is in fact the central manager. As you can guess, my_script.out will contain the script’s output:
cat my_script.out
Hello World !
Final thoughts and some things to consider
Congratulations! You have configured your own computer cluster using HTCondor workload management system. If you want to further improve your setup, you should consider the following:
-
Implement accounting groups and set quotas: HTCondor uses priorities to determine machine allocation for jobs. For granular control, you can create accounting groups and specify an upper limit on the number of slots allocated to a group of users. You can find more information about this here.
-
Get familiar with access control: Once you have set up HTCondor, you should ensure that you have strong access controls defined to prevent unauthorized access to the resource pool. You’ve already taken a step in this direction by allowing only the users from the central manager node to submit jobs to the queue. HTCondor supports multiple authentication methods and a security configuration can be defined using security policies. You can find more information about this here.
-
Implement a monitoring stack: If you have a cluster consisting of an impressive number of nodes, keeping track of each node’s health may be difficult. In this case, implementing a monitoring stack (for example, using Node Exporter, Prometheus and Grafana) could prove useful in the process of maintaining cluster’s performance and availability.
For a better understanding of HTCondor and its features, I recommend checking out the official documentation.
References
[1]: Lin, X., Li, X., & Lin, X. (2020). A Review on Applications of Computational Methods in Drug Screening and Design. Molecules (Basel, Switzerland), 25(6), 1375. https://doi.org/10.3390/molecules25061375